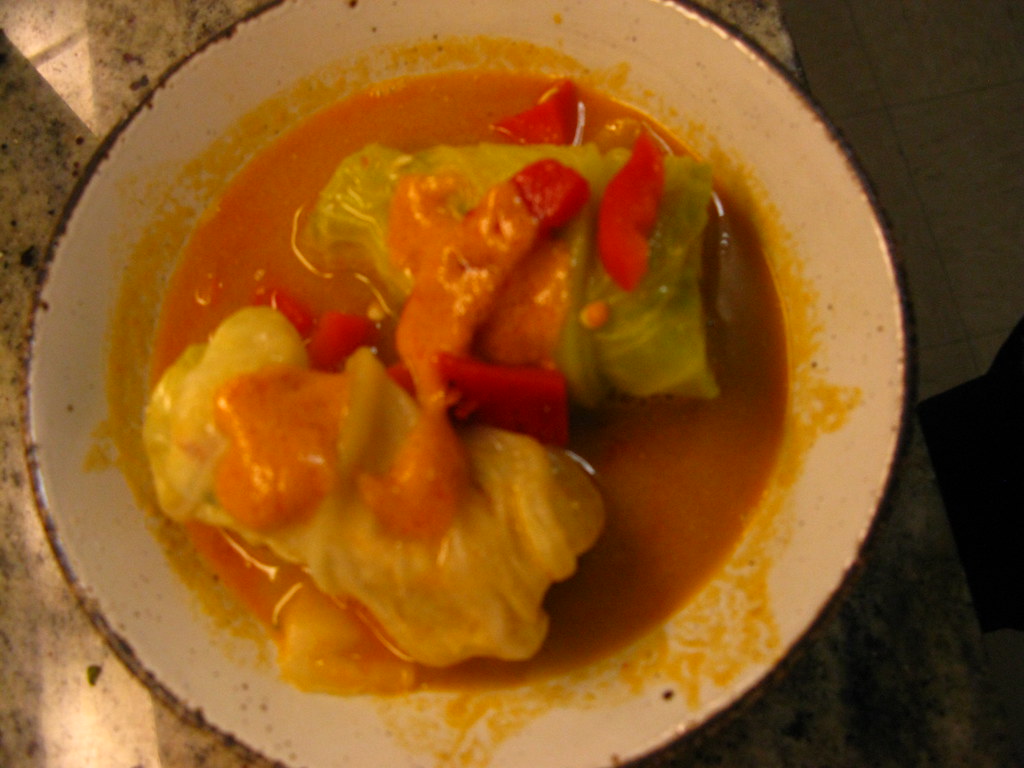
Saturday, February 27, 2010

cooking in harlem/chez panisse lobster

dinner on 5th ave

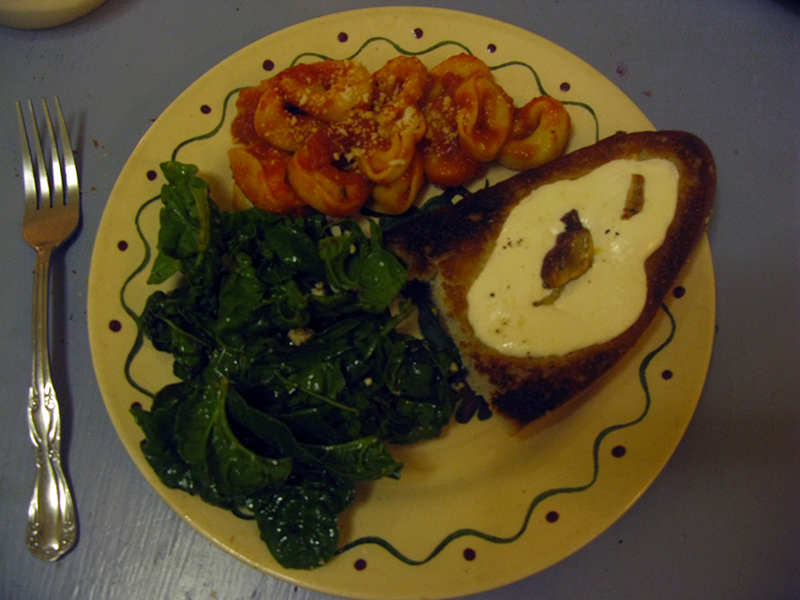
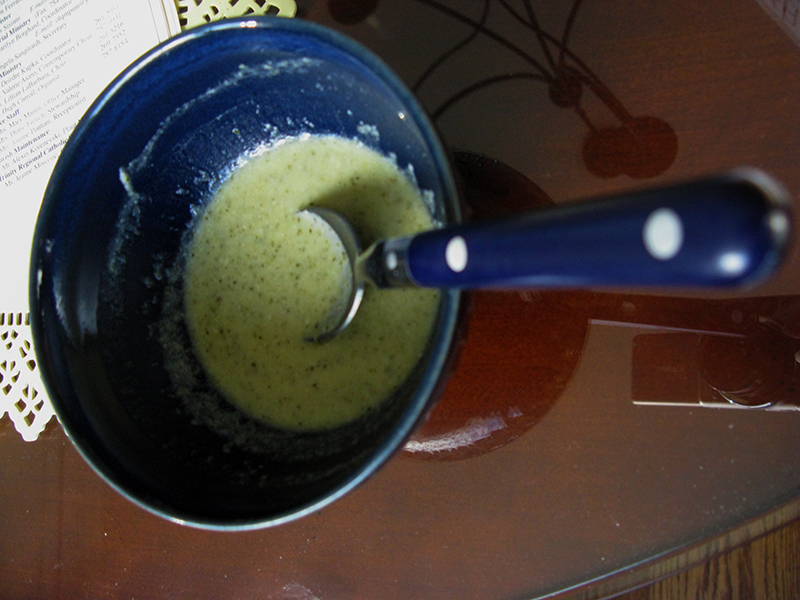
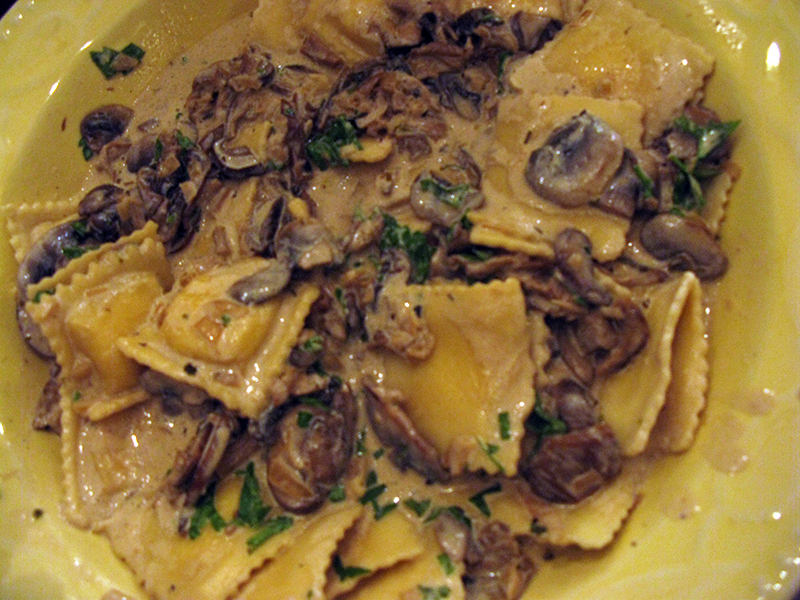
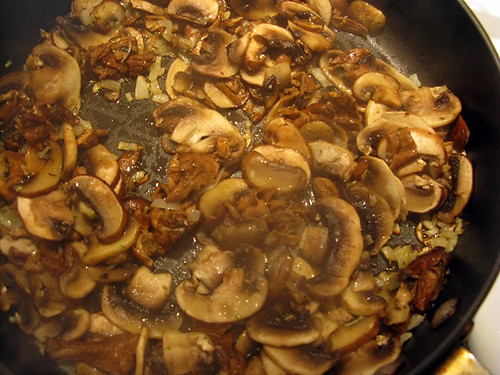
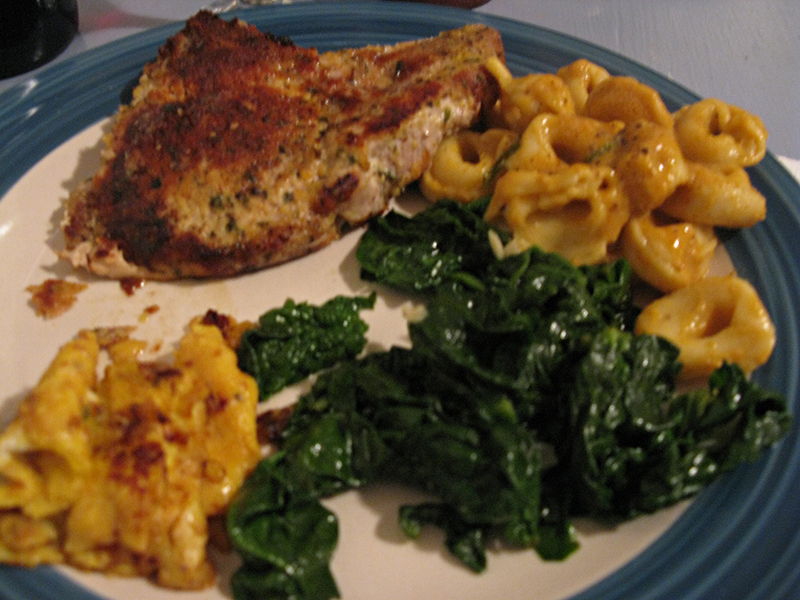
That was the first meal Nathan and I enjoyed in my new Harlem apartment. I have to admit, after a long and exhausting move, to a kitchen with 18 inches of usable counter space, I wasn't in the mood to prepare a big meal. Instead, I breaded and fried some pork chops, an easy favorite of mine. I also cooked up the extra egg and breadcrumbs afterward, which is always a yummy extra treat. For the starch and the veggie I sauteed some spinach and cooked up some tortellini. This time, I went for something a little more unusual than tomato sauce: I defrosted the lobster sauce I had made some months ago while preparing an Alice Water's recipe for lobster stuffed cabbage rolls. We paired it all with a Jose Reyes branded Cabernet that Lauren and Grace had so generously given me. Yes, Jose Reyes has his own wine. Let's go Mets.

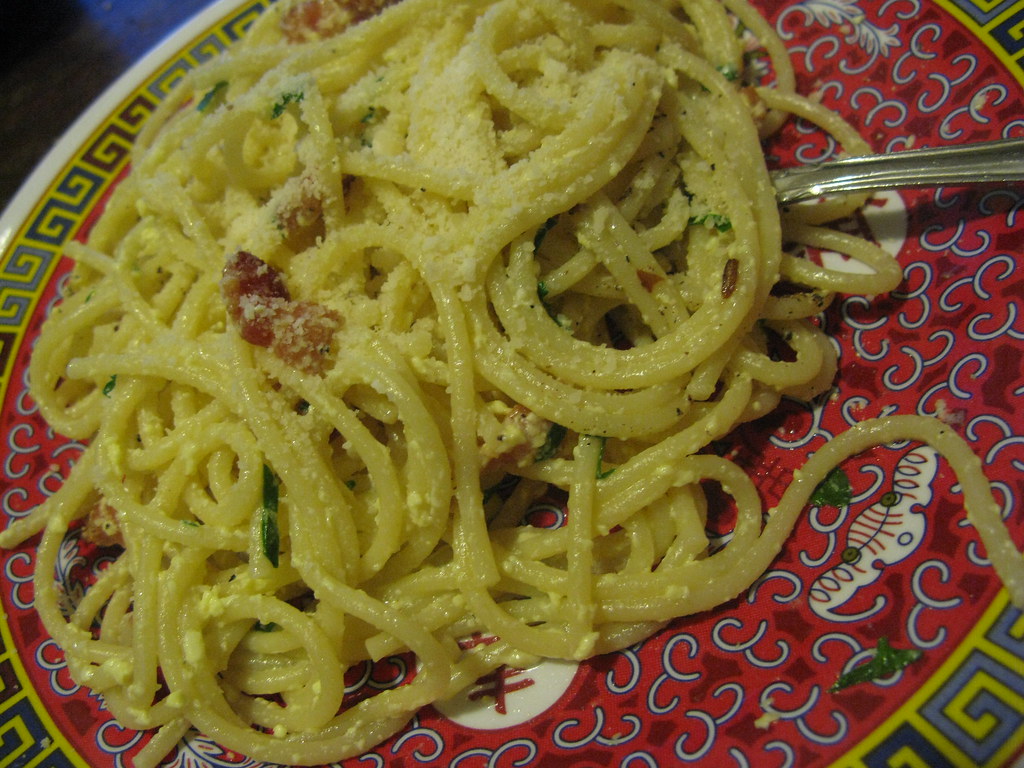
a great way to kick off cooking in my new home

Nathan and I had made the initial lobster dish for his mom and his grandma, who had previously given me the Chez Panisse Menu Cookbook after we went to the restaurant for what was an absolutely amazing meal. When we tried to recreate Chez Panisse's amazing food in Chelsea, it was among one of the most time consuming and ambitious meals I had ever prepared. However, it did yield lots and lots of a very delicious and flavorful creamy lobster sauce, which was great over Borgatti ravioli, linguini and the tortellini pictured above.

As for Alice's cabbage and lobster, I think it was a particularly impressive meal, and so I've included the recipe, which Nathan and I followed pretty faithfully. However, Alice has a whole crazy menu with lamb and shit that she serves her lobster with as part of a four course meal at Chez Panisse. With a dish this labor intensive, that was obviously not happening. (As it was, we were cooking for four hours, much to Nathan's grandma's displeasure.) So, when Alice says it serves six, keep in mind that is as first course, not a main. We only accompanied our meal with a nice loaf of french bread, and it comfortably fed four, with lots of left over sauce.

So, without further ado:


Lobster in Cabbage Leaves with Roasted Peppers
(from Alice Waters' Chez Panisse Menu Cookbook, published in 1982)
serves 6

lobster in cabbage leaves with roasted red peppers

The Cabbage:
1 head savoy cabbage, about 1½ pounds
Cut out the cone-shaped heart of a firm green savoy cabbage. Remove the outer leaves and blanch the whole cabbage in boiling salted water for 2 to 3 minutes. Drain. When the cabbage is cool enough to handle, separate the leaves and blanch them for 1 to 2 minutes. Drain them and dry them well. Cut out the large ribs of 12 leaves and blanch them for 1 to 2 minutes. Drain them and dry them well. Cut out the large ribs of 12 leaves and trim them into rectangles about 5 inches by 3 inches.
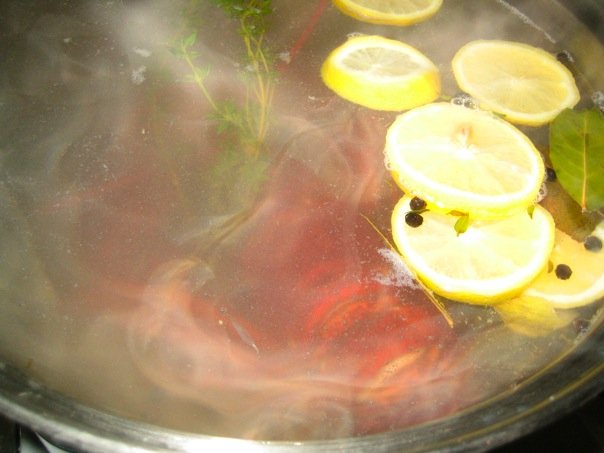
boiled alive

To Cook the Lobster:
3 lively lobsters, 1 to 1½ pounds each
½ cup coarse sea salt
2 bay leaves
4 sprigs thyme
1 lemon
10 to 12 black peppercorns
Prepare a court-bouillon of 8 to 10 quarts water, ½ cup coarse sea salt, 2 bay leaves, 4 thyme sprigs, 1 sliced lemon, and 10 to 12 black peppercorns. Bring the court-bouillon to a rapid boil and cook the lobsters in it for about 3 to 4 minutes. Remove the lobsters. Strain and reserve the court-bouillon. When the lobsters are cool enough to handle, remove the meat from the tails and claws and reserve it. Remove the gravelly stomach sac and discard it; reserve the shells and the coral, if any.
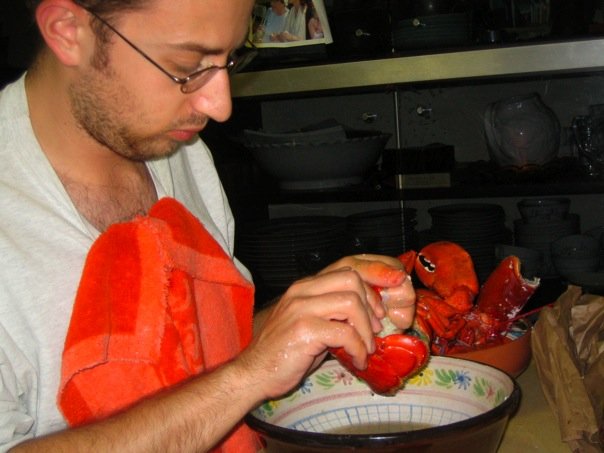
dismemberment

The Lobster Bisque:
The reserved shells (and coral) from the cooked lobster
2 table spoons olive oil
¼ pound unsalted butter
2 medium carrots
2 medium onions
1 medium leek
1 celery rib
3 shallots
2 tablespoons Armagnac or Cognac
1 cup white wine
3 medium tomatoes
Heat 2 tablespoons olive oil over medium-high heat and saute the shells of the lobsters for 3 minutes. Reduce the heat to medium and add ¼ pound butter (and the reserved coral). Cook over very low heat until the butter melts. Trim and dice finely 2 carrots, 2 onions, 1 leek, 1 celery rib, and 3 shallots. Add the vegetables to the pan and cook over medium heat for 5 minutes. Increase the heat and flame with 2 tablespoons Armagnac or Cognac. Add 1 cup white wine, 3 chopped tomatoes, and water to barely cover. Simmer for 30 minutes. Break the shells in a blender and force the shells and sauce through a very fine sieve. Let the sauce rest for 5 minutes to allow the butter to rise to the surface. Skim the butter and reserve it.

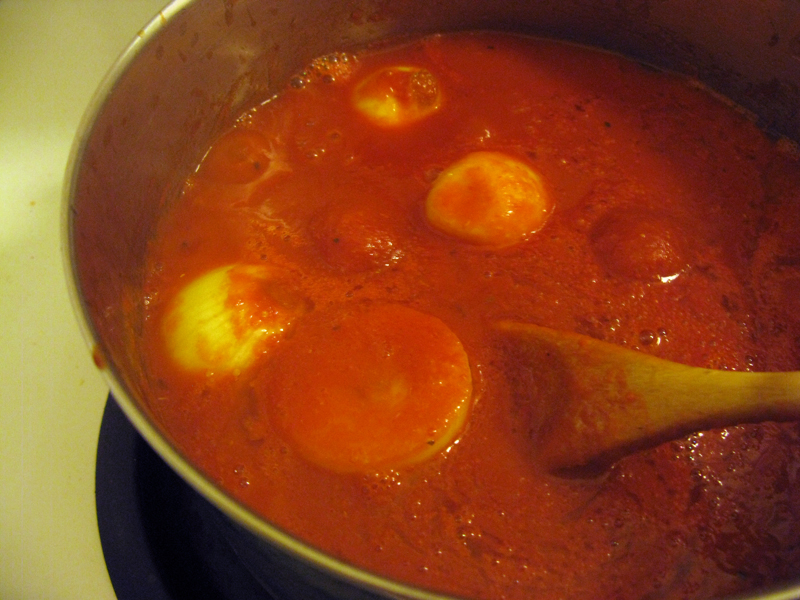
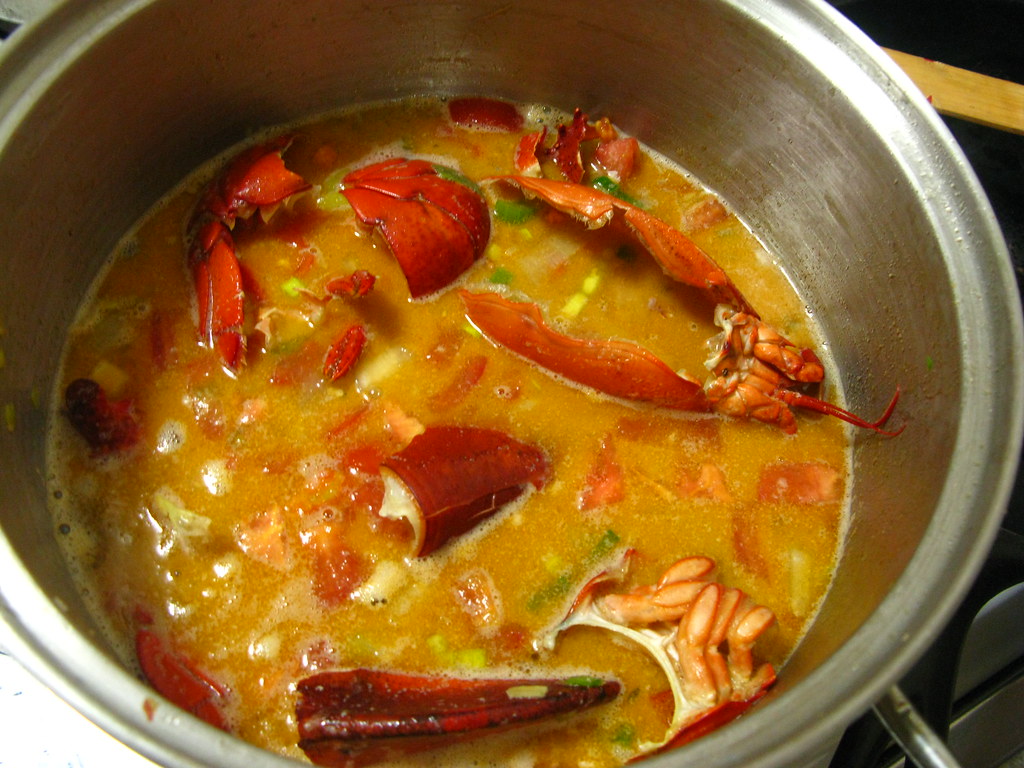
lobster bisque simmering

To Assemble the Lobster Packages:
The prepared cabbage leaves
The reserved lobster meat
The reserved lobster butter
12 chervil sprigs
The strained court-bouillon
Allow one half of a claw and one quarter of a tail for each package. Lay the 12 cabbage leaves flat on a worktable. Place the lobster meat, red side down, in the lower center of the leaves. Drizzle some lobster butter over each package and put a sprig of chervil on top of each. Fold the bottom of each leaf over the lobster, then fold in the sides and roll forward over the top of the lead to make a tightly closed package. Steam the packages to 8 to 10 minutes over the simmering court-bouillon.

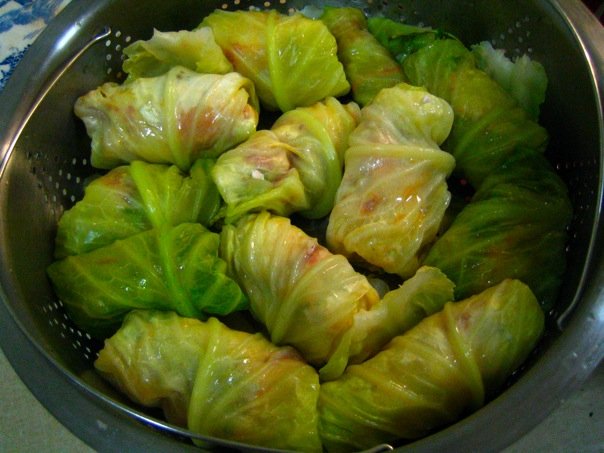
cabbage lobster rolls in the steamer

The Sauce and the Garnish:
The lobster bisque
½ pound unsalted butter
1 small red pepper, roasted, peeled, and cut into ¼-inch dice
12 chervil sprigs
Reduce the lobster bisque by half over high heat and whisk in ½ pound butter, cut into bits and softened. Remove the sauce from the heat.
Place the lobster packages on warm plates and spoon the sauce over them. Garnish with the diced peppers and chervil.

Labor intensive, but undeniably delicious, successfully preparing this dish gave Nathan and me a huge sense of accomplishment. However, we did make a couple of changes and had a few difficulties which I guess I should make note of:

1. We did not trim the cabbage leaves into rectangles, which seemed overly fussy and a waste of perfectly good cabbage. I see no reason you should either. I also am not sure what savoy cabbage is, but I used a slightly purply looking one I had gotten from the food co-op, and it was just fine.

2. The trickiest step was breaking down the bisque in the blender. Alice says to break the shells in the blender, so we wasted a good deal of time trying to do this in a leaky food processor. Personally, I don't see the point. In our attempts to force the shells through a sieve, we wound up with some tiny tiny but still crunchy pieces of lobster shell, which was kind of gross. If I made this again, I would strain the sauce and remove the shells, making sure they didn't have any of the vegetables lodged inside. Then, I would go to town with my immersion blender. I probably wouldn't even use the sieve, although I'm sure it'd be smoother and more velvety that way.

3. We couldn't find chervil, which I must admit I've never cooked with, so I don't really know what it tastes like or if it would have improved the dish. I do know there were supposed to be chervil sprigs in each cabbage roll, and that fresh thyme sprigs were not a great substitution-- the stems are too woody.

4. We had spent hours getting everything done, and rolled and steamed all our little lobster packages only to discover that we should have been reducing the bisque by half all along. By this point, we had one very impatient and hungry grandmother on our hands, and bisque that was taking forever to reduce. We ended up serving it in a thinner, more broth-like state, without the extra half pound (!!) of butter. It was like a cabbage lobster roll in a bowl of lobster soup. I reduced the large amount of leftover broth the next day, and it was definitely better for it, although it was still really delicious and incredibly flavorful as we served it.

5. OK, there is no note five, but I felt strange leaving off at four, so let me just say that I'd probably just make the bisque part of this recipe and do something else with the lobster. I might just even eat it plain with melted butter. Yum. Or make lobster roll sandwiches, which I love. This is not to say that the cabbage rolls weren't tasty, but they did hide the beautiful lobster, and I'd like to try serving my lobster in a different way next time. However, I'd DEFINITELY use the shells to make the amazing and delicious bisque. So. Good.

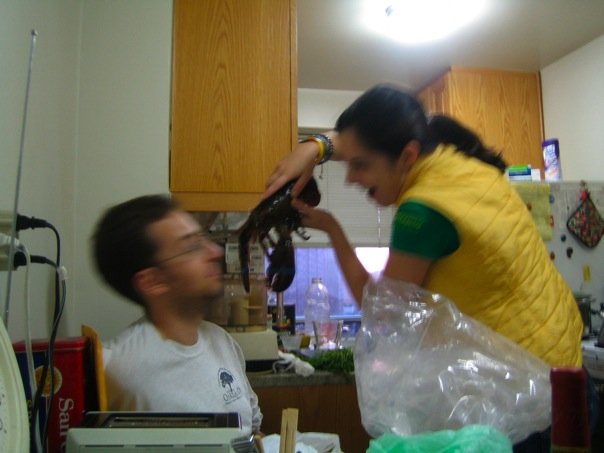
not the liveliest lobster, but still slightly startling, right Nathan?

Friday, February 26, 2010

a simple supper

tortellini in tomato sauce, sauteed spinach and a fresh mozzarella garlic crostini

This is the kind of meal I love best: delicious cheesy pasta and a nice fresh vegetable. Normally, I try to get my protein in there with some meat, but sometimes it's nice to have a lighter meal, and one without meat can be just as filling.

This meal was pretty much the offspring of my previously featured pizza party. I had initially planned to make spinach ricotta pizza, but didn't have time to saute the pizza before my guests arrived, and it just would have been too much to handle with five other people in the kitchen. However, the spinach went to good use in this meal. As you can see in the picture, it is just barely cooked. I rinsed off the leaves and then cooked them on medium heat with garlic and oil until just wilted. If there is a lot of spinach, it make take some conscientious stirring to ensure that it all cooks evenly, but even then this shouldn't take more than five minutes.

The main dish of the evening was the tortellini, which I served with the same sauce I had made for the pizzas. Normally, I make my sauce by sauteing garlic and olive oil, and then adding chopped canned tomatoes, cracked black pepper, and parsley and basil, if I have them. I deviated from the usual routine when I found this recipe, a darling of the food blog world, just days before hosting the event. The sauce is incredibly simple: half a stick of butter, and half an onion, unchopped, simmer with a can of whole tomatoes. That's all there is to it, no chopping involved! It was really quite tasty, and the butter certainly gave it an added richness. Of course, I tossed in a clove or two of garlic, because I felt wrong making tomato sauce without it. When it came to the end, I felt bad discarding the garlic and onion before serving, so I tried mashing it up with the tomatoes. If I made this again, I'd probably take it out and smear it onto some Italian bread. My only complaint with the recipe was that I felt that it wasn't as good the second day. I probably will continue to stick to my usual sauce in the future, but if tomato sauce intimidates you, this is a great one to try making, as I can't imagine screwing this one up!

tomato sauce a simmerin'

The Italian bread was also leftover from the earlier gathering, as pretty much no one had eaten it the night before. I roasted a couple of garlic cloves in olive oil with salt, pepper and a little grated cheese. This is absolutely a divine way to eat garlic or onions, as it makes them much mellower and sweeter, without totally eradicating the strong flavors that make them so delicious in the first place. I melted some bocconcini on top of the bread, and smeared the garlic clove on top. With some cracked black pepper on top, this was really simple and tasty and the perfect final component to a completely satisfying meal.

pizza odyssey

When I was still living in the Bronx, no one wanted to come all the way up north to visit. This was understandable, but perpetually disappointing. However, I have great friends, so there were occasions when they all made the trek to visit Laura and me. Generally, this happened I bribed them with food. My final stint as a Bronx hostess was no exception, as I offered our guests the best of Arthur Avenue's imported and homemade delicacies served up on a pizza.

Nathan's delicious meatsa trio

As I alluded to in an earlier entry, our old oven was a totally crazy inferno, to the point where Laura was afraid to light it. The first time I baked a cake, I was shocked to discover that it was cooked through in less than half the prescribed time. It was absolutely impossible to tell what temperature the oven was set to, and I would have to try and gauge by opening the broiler to see the size of the flame. Needless to say, this was a considerable culinary challenge when it came to most foods. However, when it came to pizza, I had long suspected that the high temperatures would only work in my favor.

creamy taleggio cheese with porcini and cremini mushrooms make the night's best pizza

Professional pizza ovens exceed 1000 degrees as a matter of course, so home cooks have difficulty replicating their results. Many bloggers have tried and failed, but they didn't have my oven. I cranked it up to full heat and left it on until my entire apartment was swelteringly hot-- no small achievement considering the jerks downstairs hadn't turned on the heat all month. Anyway, my mom gave me grandma's old oven thermometer, and the needle went past the maximum temperature of 500 degrees and back past 250 degrees before something inside it burst and covered the interior with chalky dust. Also, I got nice rubber coated pot holders for Christmas, and they actually started melting. This pizza party was intense, and probably the closest I'll ever get to making pizza parlor pies at home.

prosciutto di parma, pepperoni, polly-o and sausage

I was pretty proud of how well the whole thing came off. I made my own dough, my own sauce, and used fresh herbs and the finest toppings that Arthur Avenue had to offer. However, that is not to say that things went off without a hitch: my first pizza was actually a total mess. Jess lent me her pizza stone, so I put that in the oven to get properly hot. If you're properly equipped you use a wooden peel to transfer the pizza onto the stone. I was not properly equipped, so I thought maybe I could just drop the pizza in there on a sheet of wax paper. I tried this, and as you probably will have guessed, it immediately began to burn and melt. We awkwardly attempted to transfer the first pizza to a sheet of aluminum foil and tried again. The final product, with tomato sauce, fresh mozzarella from Casa and fresh basil and parsley, was delicious, but more closely resembled a ghetto disaster of a calzone than a proper pizza.

the first attempt: a delicious mess

However, we used the foil technique for all the rest of the pizzas with wonderful success. I ended up making five pizzas that night and seven overall. (I baked up the rest of the dough with some olive oil, herbs and a little grated cheese to make pizza flatbreads to bring to Jess and Marc's birthday). In addition to the deformed plain pie, there was pepperoni one, and several specialty pies: a porcini cremini mushroom taleggio pizza with fresh basil, a lox pizza with a sour cream, dill, shallot sauce and Nathan's home cured salmon, and my boy's prosciutto di parma, sausage, pepperoni stuffed crust send up to the meatsa trio, ingredients purchased at Arthur Ave's amazing Calabria Pork Store.


Nathan's homemade lox with fresh parsley and a dill sour cream shallot topping

The next day I also made two pizzas including a three meat pizza with Polly-O cheese (ran out of the fresh stuff!) and fresh basil and parsley for lunch. They were allllllll awesome, and so easy to make! I've recently recreated the mushroom pie as a crostini, so you can expect an elaboration in a later post, as well more on the homemade tomato sauce. Also, hopefully Nathan will also share his lox with you. For now though, I'll leave you with everything you need to know to make your very own pizza dough.


the risen dough

This recipe makes two 10 or 12 inch pizzas, depending on how successfully you stretch the dough! Bake as soon as you've topped your pizza, and at the highest possible temperature, as it will cook faster and keep the dough from getting soggy and your pizza from being a floppy mess.

Carefully stir one packet of yeast into a cup of warm water with one tablespoon or either sugar or honey. I used sugar, because I forgot my honey at my apartment and I made the dough at Nathan's because boyfriend has a bad-ass Kitchen Aid, but lots of recipes seem to prefer honey. While the yeast is getting nice and frothy, (let it sit for about 5 minutes), mix three cups of flour with two or three tablespoons of olive oil and a teaspoon of salt. Slowly add the yeast and water, mixing until they form a dough. This is easier when you have a mixer, but definitely doable by hand. After it comes together, knead the dough on a floured surface for a few minutes and then form it into a ball. Drizzle olive oil into a bowl to coat it, and set the dough in it to rise, making sure to cover with a towel or plastic wrap. The dough should double after an hour or two, after which you want to knead it again. At that point, you can let it rise again, or you can get down to the business of making pizza, giving each pizza crust a nice dusting of cornmeal on the bottom to make it less sticky. I let my dough rise again for hours and hours, and that was fine. I even refrigerated some of it over night and kneaded it and let it rise again before I finally baked it. You can also freeze your dough, but I think you have to do that before it rises. I was totally expecting to fall flat on my face with my first attempt at pizza dough, but it was surprisingly easy. Try it!

more pizza dough than you could possibly ever need

Wednesday, February 17, 2010

Zero Cabbage


tomato-braised cabbage

Don't worry about that bread in the picture. Tonight we're talking about cabbage.

This is a really easy way to add a vegetable with a complex, acidic flavor to your meal. The basic idea is to braise some cabbage with various tasty liquids. I call this dish Zero Cabbage. I used to call it Ultimate Cabbage, because I just made this shit up and I was feeling pretty pleased with myself. Then tomato puree got added to the mix, and it was an entirely new, decidedly better dish. My humble name didn't leave a lot of room for improvement, so I went with the strategy they used when they discovered a new, more important Law of Thermodynamics: call it number zero, because zero comes before number one. Thus Zero Cabbage, a preparation of braised cabbage with various sauces and tomato puree, was born.

As an added bonus, this is one of the few dishes Sarah will stuff into her craw that doesn't involve any onion, garlic, or olive oil. Imagine that.

To make the pictured cabbage, you will need:
- About half a head of cabbage, roughly chopped (this makes enough for 2-4 people)
- Vinegar. Any kind will probably do, I've used balsamic and white on different occasions, both to good effect.
- Worcestershire Sauce
- Mustard. Honey mustard is best, but as long as you've got a reasonable mustard (i.e. not just French's) you should be fine.
- Tomato puree of some sort.

The beauty if this recipe is that you can use anything that happens to intrigue you as you rifle through your kitchen. At various points, I've thrown in red wine, teriyaki sauce, chicken stock, and citrus, in addition to or in place of the above ingredients. Go buck wild. Think of the cabbage as your canvas as you fling a hideous modern art masterpiece of flavor onto it.

Executing this dish is simple:

1. Chop the cabbage. It doesn't need to be even, pretty, or even all that small. Don't kill yourself.

2. Put 2-3 tablespoons of each other ingredient in the bottom of a medium-sized pot. I just made that measurement up, you really just want to eyeball it. Put the cabbage on top. If you feel like adding some more ingredients at this point, just pour them in on top of the cabbage. No need to be precise, just use what seems like an appropriate amount of liquid for the cabbage.

3. Cover the pot and place it over medium-low heat. Let it do its thing for half an hour or so, occasionally checking on the cabbage to make sure it's not getting too hot or dry. If it is, just lower the heat or add a splash of water.

4. Remove the pot from heat and keep covered until you are ready to serve.

Enjoy.

Thursday, February 11, 2010

julia's roast chicken

So tonight's blog entry is coming to you sans photographs, because our dinner took so long to cook that I lost all hope of it being any good. But I'm getting ahead of myself. Last night, during "Snotorious" or whatever, Nathan came over to cook dinner. I had off courtesy of the storm so I decided to defrost the half a chicken Laura and I had gotten from the food co-op back in December.

Nathan is not exactly the world's biggest chicken fan, so he was pretty unhappy when I told him what I had in mind for our meal. However, I stood my ground and decided to roast it and serve with some plain white rice and food co-op cabbage. Nathan acquiesced, on the condition that we try to do SOMETHING to make a plain roast chicken more interesting. I had gotten an email from Cook's Illustrated with this recipe that prescribed coating the skin with baking powder so as to make it extra crispy, but required it sitting for 12 to 24 hours before cooking, so I went back to the drawing board. One basic search provided the obvious solution: Julia Child's famous roasted chicken. It didn't require any special ingredients or complicated techniques, and is one of those classic recipes that's been garnering rave reviews for decades. Also, Julia Child is my girl. I grew up watching her and the Frugal Gourmet (who turned out to be a perv, but that's beside the point).

The recipe basically calls for washing and drying the chicken in hot water, which I did, and rubbing it with salt, pepper and butter. Throw a halved lemon and onion inside the cavity, and throw it in the oven for 15 minutes at 425 degrees. After that, turn it down to 350 degrees, and baste. Julia's instructions included plenty of basting, but I didn't see much liquid to baste with. I definitely wanted to keep things nice and moist, so I just drizzled on some olive oil. After another 15 minutes you were supposed to toss in a chopped onion and some chopped carrots, but I was out of carrots so the onion had to suffice. I also added more olive oil.

At this point, it should have been done after another 15 to 30 minutes, but this chicken took FOREVER. I was starving and we tried the thermometer, and no dice. Ten minutes later, I was ravenous, but the thing was still legitimately raw when we cut it open. In desperation we cranked up the heat and let it sit, and finally the thing cooked all the way through. At this point I was cranky and Nathan's chicken skepticism was severely lowering my expectations. However, this was a fucking beautiful organic chicken, and I was cooking with Julia's instructions, and I should have known to keep faith.

Big surprise: Julia Child knew what she was doing when it came to roasting chickens. I know, I know, this is something she's universally renowned for. However, that doesn't mean that the results aren't extraordinary. Juicy, moist, bursting with flavor with amazing crispy onions.... This may have been the best chicken I had ever eaten. So amazing. I was thrilled with the results, and even Nathan concurred that this would be worth making again if we could get our hands on a nice chicken.

I just wish I had a photo of this deceptively simple masterpiece!

Wednesday, February 10, 2010

an old standby


spaghetti carbonara

One of the first things I ever tried to make myself for dinner was spaghetti carbonara. It is deceptively simple: just linguine, eggs, half and half, grated romano cheese, parsley, bacon, garlic, salt and pepper. However, the proportions of these things are extremely important. Perhaps unsurprisingly, my general tendency to wing things, which generally serves me well, often is my undoing when it comes to carbonara.

Unfortunately, this particular evening was a prime example of poorly proportioned carbonara-- dry, and short on bacon. Plus the problems were exacerbated by two less than ideal substitutions: spaghetti for linguine and a particularly pungent parmesan for romano. Nathan will disagree with me but I really feel that the creamy sauce coats the flat linguine noodle much better than it does a round spaghetti strand. That being said, I think that this linguine's biggest problem was the parmesan, which we got from Whole Foods. Normally, I use grated Romano, which is cheaper, but I'm always happy when restaurants serve parmesan. The grated cheese is a big part of the recipe, but with parmesan, it became quite overpowering. I'm not sure whether to chalk this up to simply adding too much cheese, or to the parmesan being more strongly flavored than the romano and therefore serving better as an accent than as a main component of the sauce. You live you learn, although that's not to to say it still wasn't pretty tasty.

I've asked my dad for the exact recipe for my own future reference and to also benefit our non existent readers. Unfortunately, even that's a bit sketchy on the exact ratios. What he's written down is a quarter pound bacon and "lots of garlic," one egg and four tablespoons half and half. I'm not sure how much cheese he uses, or even how much pasta that's for. I know he normally doubles those quantities, so maybe that is what he uses for a half pound linguini? Haha, I guess this is where I get my tendency to just add ingredients haphazardly without measuring. I will add that it is a good idea to reserve some of the pasta water to add to the sauce if you find that it is too dry. This probably would have helped me out on this particular occasion.

We accompanied our pasta with a fresh green salad that we made up at Whole Foods. This is generally a good plan for us since we don't have to buy a whole head of lettuce, which will often go bad before it is used up. We make sure not to add too many heavy toppings to keep the weight and by extension, the price, down. For example, we can make up a hard boiled egg once we get home if we so desire. Usually Nathan is on salad making duty, but on this night I took the helm. I used all three salad mixes they offered at the salad bar: spinach, arugula and micro greens, and topped it off with some red onions and plenty of croutons and blue cheese. I don't recall exactly, but I think we just dressed it with some simple olive oil and vinegar.


blue cheese salad

I'll leave you with a shot of the lovely Picket Fence wine that completed our meal, which Nathan got from his dad for Christmas. I won't tell you what our evening activity was that night, but the eagle eyed reader will take note of the subtle clue in the following photo.


picket fence wine

Monday, February 8, 2010

broccoli soup save

If you ever kill perfectly good broccoli by steaming into oblivion, fear not, there IS a save:

creamy broccoli soup

I destroyed the broccoli I made to go with our mushroom ravioli, but before I went to bed that night I transformed it into to a perfectly good meal. This salvation soup was my mother's genius suggestion, and this epicurious recipe served as my guide. Should overcooked broccoli happen to you, simply saute the soggy florets with a little garlic and butter, and then mix in a spoonful of flour or two, (I used gluten free bread mix, which was fine in such a small dose). After the flour is properly cooked, add stock and let simmer. Puree it up with an immersion blender and then add half and half, with salt and pepper to taste. I then grated in what was left of my parent's white cheddar cheese and almost all of their romano cheese. This became a lovely and not overwhelmingly cheesy dish.

To prove to you the restorative powers of this preparation, I'll recount my brother's initial skepticism and ultimate conversion. I offered some to Matt when I was heating it up for lunch, and he gave me a look you would expect from a picky four year old. Broccoli is not without its detractors, and that is probably due in large part to how bland and tasteless it becomes when it is terribly, horribly overcooked. This soup, however, completely rescues a dead vegetable. When I finally convinced Matt to try just a spoonful, he was all "wow, Sarah, this is DELICIOUS!" and helped himself to a big ladleful. So lest you think I'm biased, know that this one has the Matt Cascone stamp of approval!

Sunday, February 7, 2010

ravioli with creamy mushroom sauce

ravioli in creamy mushroom sauce

So on January 31st, I moved, leaving the Italian mecca that is Arthur Avenue for the food ghetto of Harlem. In many ways my living situation has improved, but not in terms of food vendors. Therefore, I made a point to take full advantage of Teitel Brothers, Casa Della Mozzarella and Vincent's Meats while they were still in walking distance.

I was going home to Long Island two weekends before I moved, so I thought it would be nice to bring along some Arthur Avenue treats. I'm glad that I did, as they're far less convenient and accessible now that it's February. When I found out my brother would be working Saturday night, I decided to pick up some Borgatti ravioli for dinner. They are the most delicious perfect stuffed pasta in the world, but Matt has celiac, (a gluten intolerance), and can't eat them, so normally we don't either out of familial solidarity. With Matt not around, we were free to indulge in all the gluteny goodness we wanted. That being said, the sauce itself is gluten free and would have been delicious over a good gluten free pasta.

With the ravioli as my starting point, I remembered that I had some white button mushrooms left over from that yummy mushroom tomato sauce I mentioned in the year's first post, so I thought I could make up a nice, earthy mushroom sauce for the pasta. I bought about $8 worth of dried porcini mushrooms at Teitel Brothers-- they sell for a whopping $39 a pound, but I saw them during the holidays at Mike's Deli for $99/lb, so this was actually a comparative bargain! Back at home, Mom got some creminis, which are really young portabellos, and I found a tasty sounding Wolfgang Puck recipe to use as reference.

I started off by making up a quick chicken stock from some bones Mom had in the fridge, carrots, celery, onion, fresh parsley, some dried bouquet garni herbs from the cupboard and lots of water. While this was simmering, I soaked the porcini mushrooms in warm water to rehydrate them and chopped up the button and cremini mushrooms, reserving the stems. Once the stock had been cooking for an hour or so, I took about a cup of it and put it in a smaller pot with the stems to make what Wolfgang calls a mushroom stock. I also took the liberty of adding in the porcini soaking water, which I poured carefully so as to leave the grit and dirt at the bottom of the glass. I let that mixture cook down by half.


mushrooms sauteing

While my mushroom stock was reducing, I sweat garlic, shallots and onions in what turned out to be too much olive oil. When they were all translucent I added and sauteed the mushrooms for about five minutes. Then I added a few glugs of white wine and the reduced stock (sans stems), and let that cook down. When I added the half and half (a cup by Puck, eyeballed by me), it became clear that the whole thing was just too oily, and the sauce never really thickened the way I wanted it too. Oh well. It was still delicious with some salt and pepper over those freshly made raviolis. Boil some water, add salt, and cook them just until they float, and they're ready.

My mom made up some awesome grilled chicken to go with it, marinaded for about a half an hour with parsley and white wine and who knows what else. I also steamed some broccoli, but I forgot about it because I started watching a Steve Martin/Goldie Hawn movie, and it wound up totally mushy and I now know the reason why everyone hates broccoli. Luckily, I was able to resuscitate it in the form of a delicious broccoli soup, but that is a story for another post.